This post is the third in a series describing how to build a DIY deck. The first decking post concerns how to calculate the floor load width and layout of your decking timber substructure, the second post enters into the specifics and variables of installing your deck’s substructure. This post will cover the installation of your decking boards.
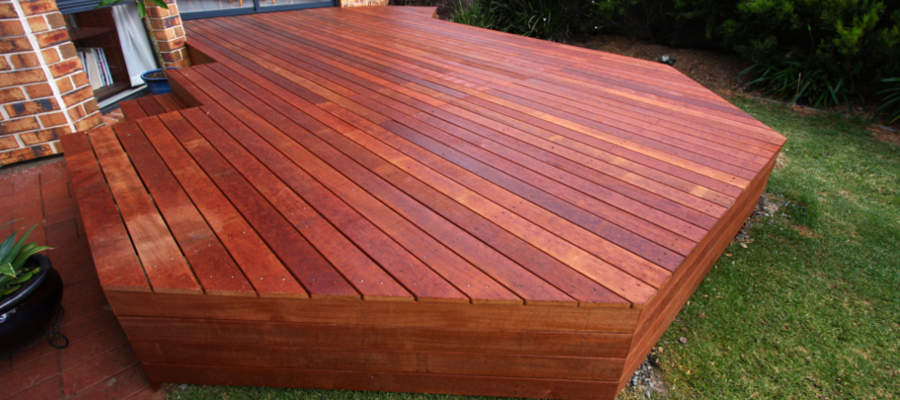
Once you’ve completed your deck’s substructure, the last step left is to install your decking boards. As there are a number of different varieties of decking timber, it follows that there will be a few different considerations in the installation of the decking.
Something that will have been decided in the previous steps but is worth noting here is that you will want to know which way your decking timber is going to run and you will want to organise yourself accordingly. Before you begin installing your decking timber you should arrange it into lengths as closely as possible and place the decking boards in a stack in a spot that will be both relevant to where the decking will be installed and not intrusive to your working order.
A few notes on the direction in which decking should run. The primary decision affecting the running direction of decking timber is usually aesthetics. Two things to consider aside from this are that you can sweep a deck more effectively down the line of decking boards (if you have a lot of leaves/junk fall on your deck) Secondly, you might be wise to consider the width and length of your deck and whether one might fit a standard length of decking timber. For example if you have a deck that is 6.7m long and 3m wide, it would make sense to run your decking timber across the deck as 3m is a standard length for timber. This will save you both a lot of cutting as well as any unsightly joins and wastage (potentially some money too) It should be noted that most hardwood decking is not available in set lengths so this applies primarily to treated pine decking.
If your decking timber is running parallel with your house it’s best to start installing your decking from the outside and work your way back towards your house. That way you will ensure that any half of a decking board will be against the house. Furthermore you can change the gaps between decking boards as you get closer to house to try and get around having to cut a board in half. Check for squareness every 4 or 5 boards as you approach the house as timber can vary slightly in width along the length of the board.
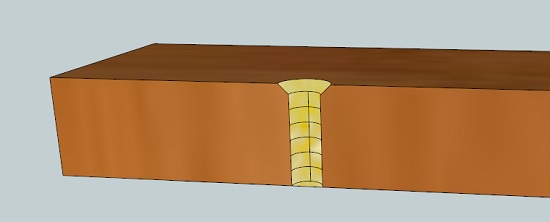
Once you’ve got everything organised and ready you can start to install the decking boards. When using treated pine decking you can nail directly through the decking into your joists or you can use a nail gun to attach your decking. We recommend that if you are using hardwood decking that you pre drill your decking boards to achieve a more orderly simpler finish and avoid bending nails and potentially catching knots with nails. In the case of most hardwood decking you will need to pre drill simply to get the nail through the timber.
The best way to pre drill your decking timber is to use a marking gauge or a pencil and jig setup. This way you can get all of your drill holes in line for a neat finish on your deck. Run through each of your decking boards and mark the spot that you need to drill. Use a drill bit that is the same size or slightly smaller than your nail. For a 3 mm nail with a 3.1 mm head, use a 3mm drill bit. Drill the holes all the way through your decking timber. If you are using screws instead of nails on your deck you will want to use a countersink tool on your drill that is appropriate to the type of screw you are using to achieve a smooth finish where your screws will be flush with your decking boards. Softwoods recommend using stainless steel for both nails and/or screws when fixing your decking. Stainless steel won’t corrode or stain your decking timber, and provides a sturdy good looking finish.
Once you’ve pre drilled enough decking boards to install a reasonable section of your deck you can then start to install them. Simply nail or screw your decking timber to your joist to attach it. Once you’ve installed one decking board, you can use a screw to space the next board (or a spacer of your choice) so that all of your decking is evenly spaced throughout. You do need to leave some space however as decking timber will move as it expands and contracts naturally in the hot or cold.
Occasionally you will find that you don’t have enough length in your decking timber to traverse a particular section of your deck. In these cases you will need to join two decking boards. The simplest and most effective way of doing this is to join two boards over a joist. Butt each end of the decking board into each other over the joist, pre drill a hole in each decking board and fasten with a screw or nail to the joist. This way both decking boards will be securely fastened and there will be no loose timbers in your deck.

You may need to finish the edges of your deck once all of your decking boards are installed. You can create a clean edge to your deck if you don’t have one by marking and cutting along the decking boards with a circular saw. You can also make the edge of your deck neater by adding a barge board to the edge of your decking. If you are going to do this, you will need something to fix to (which ties into considerations addressed in part two of this post) If you don’t have a joist on the outside edge of the deck, you might need to use some extra timber to fix to the nearest joist.
Once all of your decking boards are fastened, your edges neat and your deck is complete you need to complete the final step. Your deck requires oiling or staining. This is a very simple process and will ensure that you have a great looking DIY deck for years to come. There are a number of decking stains/oils available in the market in a wide range of colours, Softwoods recommend that if you are using clear treated pine decking you might like to use a coloured stain to change the look of your deck, but if you’re using hardwood decking you’ll likely prefer to stain your deck with a clear decking stain or oil to let the natural beauty of the decking come through. To apply the stain/oil simply purchase an applicator and mop the stain on thoroughly (oil may require a second coat, stain generally needs one)
You will need to re-apply your stain/oil once every 6 months or so if you want your deck to remain in perfect condition. To do so is simply a case of sweeping the deck clean and mopping on another coat of stain/oil.
Once your deck is stained it is for all intents and purposes complete! We hope that this guide has been helpful in some way, and that it might have given you some information or considerations that you otherwise might not have known about. If you are researching a decking project let us know if we can quote on your decking kit for you.
To give you a quick look at how we build a deck, watch the 1-minute video below.
Thanks for reading.
Softwoods
Softwoods is an independent, family owned company that has been trading for over 30 years. In that time we’ve worked hard to build a business that we’d like to deal with if we were building in our own backyards. We’re community minded, environmentally conscious, and always focused on our customers experience.
ABN: 49 076 530 848
Our Locations
573 Port Road, West Croydon SA 5008
Phone (08) 8346 1499
493 Wright Rd, Modbury SA 5092
Corner Wright & McIntyre Roads
Phone (08) 8396 4044
Email modbury@softwoods.com.au
28 O’Sullivan Beach Road
Lonsdale SA 5160
Phone (08) 8384 5133
Suite 15 Plaistowe Mews
102 Railway Street
West Perth WA 6005
Phone 1300 737 465
Copyright © 2024 Softwoods • Pergolas, Decking, Fencing, Carports, Roofing • Site by Adelaide Websites
© 2024 Softwoods - Pergola, Decking, Fencing & Carports, Roofing.
Close Menu
We Ship Australia-Wide