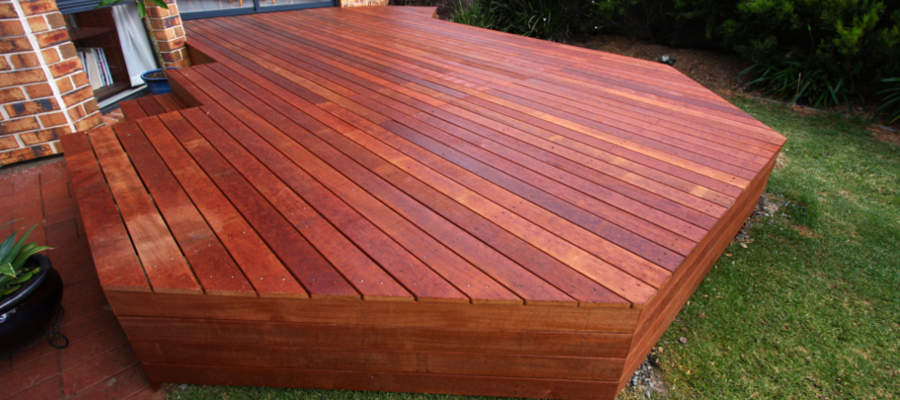
Building a deck from timber is one of the easier DIY projects that you can undertake that will have a lasting positive impact on both your lifestyle and your home’s value. This is the first of a three-part DIY series on how to build yourself a deck.
Once you’ve decided to undertake the project, the most critical part is the planning and calculation of the timber you require for your joists and bearers in order to properly support your decking structure.
The process involved in planning for your deck involves several steps, firstly, you need to calculate the floor load width of your bearers, then select your bearer size and post spacings based on this information, and lastly select the correct size of your joist based on their required span. The use of span tables and floor load width calculations will be explained in detail further in this article, and hopefully you will finish reading with a good idea of what’s required to build a great deck for your home.
Please keep in mind as you read this guide that if you would prefer to have all of the calculations and planning work done for you, the teams in our stores at Softwoods are more than happy to do it all for you at a moments notice. If you’d like a free quote on your decking project please get in touch at any time.
In order to create your own deck, familiarity with the parts is required. Bearers are the timbers that are attached to the stumps or posts that support the deck and Joists are the timbers that are attached across the bearers to which the decking boards are in turn attached.
In addition, the concept of single and continuous span must be explained. A bearer that is considered to be single span, is fixed to stumps at each end of it’s length with nothing in between to support it. A continuous span bearer is one that is supported at more than two points along it’s length. For example, a deck that is 1 metre long and 1 metre wide is likely to have only two bearers, one either side (running the length of the deck) and will be considered single span as each bearer will be supported only at each end. Alternatively, a deck that is 1m wide and 10m long will still have two bearers each running the length of the structure, but they will need support along the 10m length from several stumps, and as such will be considered to be continuous span.
The load that you put onto your deck can at times be very large indeed, so correct calculations of the stiffness and strength of the internal timbers of your deck are essential. The flexibility of timbers and their strength is taken into account in the Australian timber framing code that is used to create span tables for both Bearers and Joists. Selecting the correct timbers and the layout of your deck is relatively simple once you are able to interpret these tables which are based on engineering calculations that are far too complicated for most non engineering types.
To correctly calculate the minimum strength and placement of the timber that you should use on your deck, you need to first establish the floor load width of your bearers, and then the spacing of your posts. The image and text below is a simple guide to the concept of floor load width.

As you can see, there are three different possible variables in a floor load width calculation.
First is bearer A, which absorbs half of the load of distance Y, as well as the overhanging distance X
Bearer B is different in that it is internal and has a bearer on either side of it. Due to this, the floor load width of bearer B is half of both distances Y and Z
Bearer C is another different calculation in that it is only bearing a load in one direction. As such, the floor load width of bearer C is half of the distance Z
In order to calculate your own floor load width you will need an idea of the size of deck that you want to build.
As a practical exercise we will choose a deck that is 10 metres long and 6 metres wide. The deck will have four bearers of continuous span running the 10 metre length of the deck. Two are on the outside of the deck, and two internally, creating three gaps of approximately 2 metres
**(the best number of bearers, posts and joists is a highly variable proposition(both in terms of value, labour and structural integrity) and can be best determined by people with lots of experience in building and designing decks)
In order to establish the required size of your bearers and the post spacings for your deck you need to calculate the floor load width of your structure. We will use the diagram below for reference.

Both Bearers A and D are only bearing a load on one side. This load is equal to 1 metre each as they are bearing half of the distance between them and the nearest bearer.
Bearers B and C are however bearing a load on either side of themselves. In both instances the floor load width is equal to the sum of half of the total span on either side of the bearer (total span = 4m floor load width = 2m) for a visual representation of the floor load width, see the sketch below

Once you have determined the floor load width of your bearers you can proceed to selecting the size of your bearers and your post spacings using a span table. At Softwoods we use only F7 Kiln dried treated pine in our decking substructure. It is possible to use timber of a lower stress grade, but we feel that in order to guarantee the long life and performance of your deck it is worth using quality materials.
Span tables are made up of variables based on the engineering within the timber framing code of Australia. There are many differing span tables available, it’s recommended that you enquire about those that relate to your area.
Please be aware that there are also many variables with regards to the engineering of decks that are raised above ground. The use of double bearers, as required in AS 1684.2 is important to note and we recommended that if your deck is to be over the height of a metre that you should contact us for a quote and to help you with your plan to ensure your safety and compliance with your local council or shire.
For the purpose of our exercise we will use a span table for Decking bearers with a continuous span. In order to select the correct bearers we need to have established our floor load width, which in our case is 2 metres (always use the largest floor load width from within your structure)
In order to use the table, select the floor load width from among the top line of the table (in this case 1200mm, 1800mm etc) our example is 2m (2000mm) and use the corresponding column (2400mm) below to select the appropriate size of bearer from the list on the left, and the post spacing measurement to match from within the column.

For example, our floor load width of 2m means that we need to use the 2400mm column to determine our bearer size and post spacing. We can select 190×45 bearers, which will require posts every 2.1 metres along our 10m long deck (resulting in a total of 6 posts per bearer) or we can use 190×70 bearers which will need a post every 2.6 metres (5 posts per bearer) As you can see it’s a case of determining what is the best and most economical, yet structurally effective combination. (**note** these calculations are based on the inclusion of a post at each end of the bearers, which is not always necessary) Please also note that the post spacing specified is a maximum of 2.1m. Although it’s not necessary to have your posts evenly spaced, you must not exceed 2.1m between any two posts. This allows you some flexibility in case there are any obstructions beneath your deck that you need to work around (the same concept of maximum spacing also applies to your joists)
Once we have our bearers and post spacings determined, we have to use another span table to decide on the correct joist size for our structure. The Joist span table below is for joists with a continuous span on a deck below 1metre in height.

To determine the correct joist required, we need to establish the spacing of our joists. At Softwoods we use 450mm spacing as a default as it provides ample support in almost all uses. We do use 400mm spacings with clear treated pine as it is slightly more flexible than our other decking materials. Please see an example of 450mm joist spacing below

With your joist spacing determined you can use the 450mm column to determine what size timber you will need for your joists. The numbers in the 450mm column refer to the distance that the joists are required to span between bearers. In our example we have a 2m span between bearers, so we need to scroll down until we find a number over 2000 and select the corresponding joist size from the list in the left hand column. As you can see on the table above, this will be a 140×35 joist. You can then determine the number of joists you will need by dividing 10 metres (10000mm) by 48.5 cm (485mm) which gives you 20.62 or 21 bearers. (**Note** 45mm thick Joists are usually preferred as it is much easier to affix decking boards that join over a joist when you have a little more space to work with)
The last thing that you need to do to calculate what you will need for your deck is to calculate the number of decking boards you will need. For our exercise we will use 90mm decking boards with a 5mm gap to allow for any movement. As our deck is 6m wide, we will need 6m (6000mm) divided by 95mm (each board and gap) which gives us 64 boards. Our deck also has to run the length of 10 metres, so we multiply 64 boards by 10 metres to give us 640 lineal metres of decking. When using random lengths of decking (as will usually be the case) an allowance of 15 to 20% of wastage is also recommended. You can also at this point calculate the number of nails you will need for your project by dividing the total lineal metres by .225. In this case we have 640 lineal metres, which divided by .225 gives us a total of 2844 nails.

Hopefully, this guide will have given you a good idea of what is required to accurately determine the amount and type of materials that you will need to build your deck. For further information or any inquiries you might have please get in contact with us via the phone or come into our stores to see us, You can also click on the get a quote link in the menu above to use our web tool and get a price and drawing emailed to you within minutes.
When you’re ready to move forward go to Step 2 of this series and learn how to build the deck substructure. To give you an idea of how a deck actually gets built, watch the 1-minute video below and witness how we build one, piece by piece.
Thanks for reading.
Go to Step 2